Easter basket ideas for all ages: DIY decorations, gifts and more

By Kelly Castor, Erin Martinez and Shanna Smith on February 26th, 2024
17436 Easter Basket MC

Excited to get hopping on those Easter baskets? We love to see it. And we love to inspire it, too! So we’ve put together a bunch of fun Easter basket ideas to help you make the most of this spring celebration.

Our DIY Easter basket ideas for every age will plus up any store-bought basket you’ve got. And of course, we have allll the gifts that will make your kids so excited to be up early on Easter morning. Except maybe your teenager. Because teenagers.

Inspired? Create and share by tagging @Hallmark_Canada.

17436 Easter Basket MC
#

Easter Basket Ideas Perfect for Toddlers

16254 DIY Easter Extras 2

Toddlers are juuuuuust starting to get wise to all the fun Easter brings. And what better way to celebrate that fact than by surprising them with all things cute and cuddly or sweet and small?

For instance:

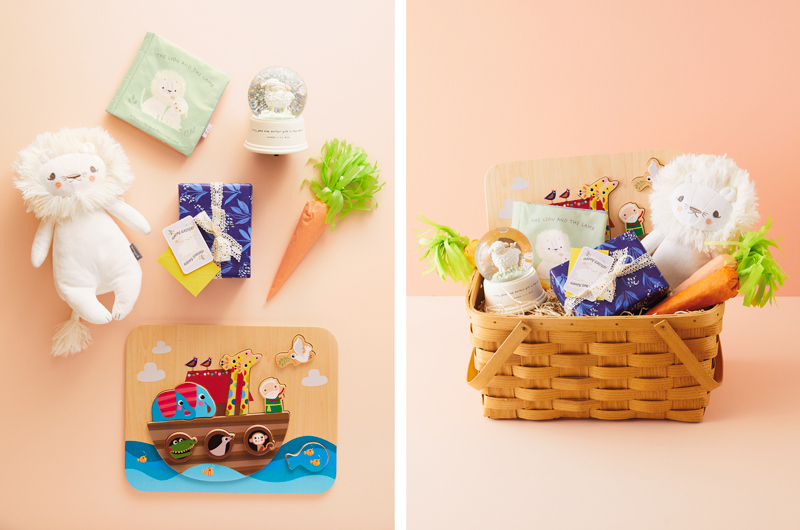
  • This recordable lion plush. You can use it to record a special Easter message or a simple “I love you.”
  • A lamb water globe. It plays a sweet little tune to send them off to sleep.
  • A Noah’s Ark wooden puzzle. It’s got big chunky pieces perfect for little chunky fingers.
  • The DIY carrot treat bag below. Imagine their eyes lighting up when they rip into it and their favourite snack is revealed. It’ll be the best Easter surprise ever.
  • A mini card for your mini me. It just doesn’t get any cuter!
#

DIY Carrot Treat Bag

16254 DIY Easter Extras Carrot 1

What you’ll need:

  • Orange or peach-coloured tissue paper
  • Green tissue paper
  • Twine or string
  • Scissors
  • Toddler-approved snack (we chose some oat-o’s)
  • Tape
16254 DIY Easter Extras Carrot 2

1. Start by cutting a square of tissue. Make a cone by bringing down the top left corner toward the centre of the square and rolling up the tissue.

16254 DIY Easter Extras Carrot 3

2. Cut off excess paper. Once you have a cone that’s a good size for your toddler’s Easter basket, trim off the remainder of the tissue paper.

16254 DIY Easter Extras Carrot 4

3. Tape down the bottom of the cone. Put another piece of tape wherever you feel it needs to stay secure.

16254 DIY Easter Extras Carrot 5

4. Pour in your toddler snack. About a half cup worked for the size of cone we created.

16254 DIY Easter Extras Carrot 6

5. Tie it up. Gather the tissue paper at the top and using a piece of twine or string tie it closed really tight. Adjust the tissue or smooth it out where needed, then secure the string with a knot. Cut off the excess tissue paper above the knot, leaving about half an inch for securing the carrot top to.

16254 DIY Easter Extras Carrot 7

6. Make the carrot top. Stack two or three smaller squares of green tissue, and cut some fringe along one edge. Feel free to make your cuts varying thicknesses.

16254 DIY Easter Extras Carrot 8

7. Add the carrot top to the carrot. Tape down one end of the non-fringed edge at the top of the carrot. Wrap it around and tape it down to finish.

16254 DIY Easter Extras Carrot 9

8. Pop your DIY carrot treat into the basket. They look especially cute nestled into Easter grass.

#

Crafty Easter Basket Ideas for Kids

17436 Easter Basket Kid

Easter means spring and spring means sunshine. And to kids, sunshine means outside time. So we put together a few Easter basket ideas for kids with that in mind.

For instance:

  • The adorable Bunny and Carrot Better Together plush duo. They can go everywhere with your favourite little, from Easter egg hunts to bedtime and beyond. (And if they love these, we’ve got sooo many more.)
  • A What I Love About You recordable colouring book! You record the sweet sayings, they put their spin on things with some Crayola crayons.
  • Speaking of…we love these Colours of Kindness Crayola® crayons (coming soon). The pastel hues are perfect for Easter.
  • Of course, Easter crayons need some free printable Easter colouring pages to go with them, right? We think so, too.
  • Some egg-shaped sidewalk chalk (coming soon). One of their favourite outdoor activities, but Easter themed? What could BE more perfect?
  • Easter gift bags. For their favourite candies or snacks. Although, if you need candy-free ideas, we’ve got them.
  • A funny Easter card. Make them crack a smile with this card featuring two very silly eggs.
  • One of the DIY bunny name tags shown below. It’ll help the kids remember whose basket is whose and keep the house argument-free…for at least some of the day.
#

DIY Personalized Bunny Tags

16254 DIY Easter Extras Tag 1

What you’ll need:

  • Crayola® Model Magic
  • Ribbon or twine
  • Rolling pin
  • Scissors
  • Crayola Take Note Marker
  • Bunny cookie cutter
  • Metal straw or something to make a small hole
16254 DIY Easter Extras Tag 2

1. Roll out the modelling clay. We rolled our Model Magic to about 1/4” thick. This makes it thick enough to work as a tag but not so thick that it takes forever to dry.

16254 DIY Easter Extras Tag 3

2. Cut out your bunnies. Using a cookie cutter, cut out as many bunnies as needed. These make cute place cards or food markers, too, so feel free to make extra.

16254 DIY Easter Extras Tag 4

3. Punch out a small hole. Use a metal straw to make a hole to thread ribbon or string through.

16254 DIY Easter Extras Tag 5

4. Let the tags dry overnight. Tags should be completely dried out by morning. Placing them on a wire rack may speed up the process a bit, as it allows for more air circulation.

5. Add your kid’s name. Once the tags are fully dried, write the name of your child on the bunny with a permanent marker.

16254 DIY Easter Extras Tag 6

6. Add some ribbon. Thread the ribbon or twine through the hole in your dried bunny tag.

16254 DIY Easter Extras Tag 7

7. Tie the tag to your child’s Easter basket or gift. You can use these to keep track of whose Easter basket is whose, or use them as a gift topper.

#

Easter Basket Ideas Teens Will Love

17436 Easter Basket Teen

The average teen probably won’t admit it, but they still love waking up to an Easter basket waiting outside their door. Our gift ideas for them include things they can get excited about without feeling embarrassed.

For instance:

  • This foldable shopping tote. It goes with literally everything and can go from school to practice to home with a sweet sentiment to inspire them along the way.
  • A Peanuts® Zip-Along Snoopy Easter egg plush. They might say they’re past the age of loving stuffies, but if it’s tiny enough, it qualifies as “cute” instead of “kid stuff.”
  • Vinyl decals for their water bottle. Or their school binder. Or their locker. Basically anywhere they want to display their thoughts on life, of which they have many.
  • A postcard and sticker set to show friends some love. We all know friends make the teen years easier. This will help them express gratitude and support in a totally chill way.
  • A tiny, sunshiny trinket dish. For keys, candy, coins…anything to help keep their desk clean!
  • The DIY pom-pom keychain below. You might be surprised at how sentimental they’ll get over something handmade. Put it in their basket and see where it ends up over time.
  • A sweet-smelling candle. It’s hard to feel angsty when your room smells like cake.
  • This sweet, simple Easter card. Just a little message with a bit of shine to let them know they’re loved—at Easter and always.
#

DIY Pom-Pom Keychain

16254 DIY Easter Extras Pom Pom 1

What you’ll need:

  • Yarn (we used three colours and they all had different weights)
  • Scissors
  • Keychain
  • Piece of cardboard
16254 DIY Easter Extras Pom Pom 2

1. Make a DIY pom-pom form. To make it, cut a cardboard rectangle about 3” x 6”. Then make a slit 1/4” wide in the middle of the short end, stopping about halfway through the piece of cardboard.

2. Start wrapping. Wrap your primary colour around the cardboard pom-pom form, covering the slit you made.

16254 DIY Easter Extras Pom Pom 3

3. Switch up the colours.

To make a spicy pom-pom, add more colours! No need to tie anything off—just cut off your first colour and start wrapping your next. We did this pretty randomly.

16254 DIY Easter Extras Pom Pom 4

4. Tie off your pom-pom. Thread a separate piece of yarn about 12” long into the slit at the centre of the cardboard form. Tie it loosely around all the yarn you’ve wrapped onto the form and make a loose knot.

16254 DIY Easter Extras Pom Pom 5

5. Release the yarn. Slide all the yarn off the cardboard, then tighten and tie the knot so it’s super secure.

16254 DIY Easter Extras Pom Pom 6

6. Cut and fluff. Use scissors to cut all the loops in the yarn, then fluff it out.

16254 DIY Easter Extras Pom Pom 7

7. Shape the pom-pom. Trim the ends of the yarn so the pom-pom looks like a nice, round sphere.

16254 DIY Easter Extras Pom Pom 8

8. Tie to a keychain. Using the extra length from the piece of yarn you used to tie everything together, tie your pom-pom to the keychain.

16254 DIY Easter Extras Pom Pom 9

9. Attach to an Easter basket. You can tie it to the handle, or if you go the route of this adorable bunny bag, attach it to one of the handles.

#

Comforting Easter Basket Ideas for Friends or Family

17436 Easter Basket Adult

Easter is a time for togetherness, so homey gifts for friends or family may be on your list, too. We’ve got several ideas to fill their heart and basket with love this Easter.

For instance:

  • This wooden charcuterie board (coming soon). For family gatherings filled with warmth and togetherness.
  • Some sweet, little serving bowls. For snacks, condiments, recipe prep or anything else their heart desires.
  • And a big serving platter, too. For serving second helpings of both food and love.
  • A fresh-scented candle. To lighten their heart and lift their spirits on spring days that happen to be grey and gloomy.
  • A pretty pouch (coming soon). So that wherever the day takes them, they’ll be reminded of the important things.
  • A pop-up Easter card. Even if they’re notoriously bad with plants, they can still have a peace lily this Easter.
  • A little twist with the DIY crochet lemon garland below. It’s bright and fun and oh-so-easy—the perfect finishing touch for your thoughtful basket.
#

DIY Crochet Lemon Garland

17436 Easter Basket Lemon 1

What you’ll need:

  • Size 4mm/G crochet hook
  • Small yarn needle
  • 4 worsted weight cotton yarn in 3 colours: Yellow, green and white
17436 Easter Basket Lemon 2

1. To start: Make a magic circle with your yellow yarn. (Not sure how to make one? A simple online search will provide lots of how-to videos!)

17436 Easter Basket Lemon 3

2. Round 1. Chain 2 (doesn’t count as a stitch), 12 double crochet into the magic circle. Untwist the yarn tail and pull the circle tightly closed. Join the circle with a slip stitch in top of the first double crochet (12 stitches).

17436 Easter Basket Lemon 4

3. Round 2. Chain 2, 2 double crochet in each stitch around. Slip stitch into the first stitch to join the round (24 stitches).

17436 Easter Basket Lemon 5

4. Round 3. Chain 2, [double crochet 2, single crochet stitch 1] in first stitch, slip stitch in each of the next 12 stitches, chain 1, [double crochet 2, single crochet stitch 1] in the next stitch, slip stitch in each of the last 10 stitches, then slip stitch in top to first chain (30 stitches).

17436 Easter Basket Lemon 6

5. Weave off ends with the yarn needle and trim. Then make four more lemons so you have five lemons total.

17436 Easter Basket Lemon 7

6. Make the leaf: With green yarn, slip knot onto your hook.

Round 1: Chain 6, slip stitch in 2nd chain from the hook, 1 half double crochet in next stitch, 1 double crochet in next, 1 half double crochet in next, 1 single crochet stitch in the next, turn and chain 1.

Round 2: Continue working on opposite side of the chain—1 single crochet stitch in the first chain, 1 half double crochet in the next, 1 double crochet in each of the next, 1 half double crochet in each of the next, 1 single crochet stitch in the last, chain 1 and join to the first slip stitch from the top side. Weave off end towards beginning thread with your yarn needle. Fasten off, leaving a long tail to attach the leaf to the lemon.

17436 Easter Basket Lemon 8

7. Sew the leaf ends through top stitches on the end of the lemons. Tie off on the back side of the lemon. We varied our leaves in directions and locations to give each lemon a different character.

17436 Easter Basket Lemon 9

8. To create the garland, start with the white yarn. Slip knot to begin, then chain 20 (you might need more depending on how much room you need to hang the garland). When attaching the lemons to the garland chain, single crochet into a stitch at the top right of the lemon, chain 1, then single crochet into another stitch at the top of the left side of the same lemon. Chain 10 then attach your next lemon.

17436 Easter Basket Lemon 10

9. Repeat until all lemons are joined to the garland chain. Chain 20 and tie off. Now you have a finished crocheted lemon garland!

We hope these Easter basket ideas have you feeling a little better prepared to shower the kids with love this Easter, no matter how old they are.

Of course, we’re here with more ideas if you need them. Here are some of our favourites: