DIY cookie decorating ideas: How to make your own sweet family and friends

By Kelly Castor on December 4th, 2023
17123 1

Delicious, versatile and fit for nearly any dessert occasion, it’s no secret that cookies are pretty awesome. And when you decorate them to look like your favourite people (or pets), they somehow get even better!

So if you love cookie decorating, want a yummy, personalized gift, or just need to practice all the skills you’ve learned from watching so many baking shows (you know who you are), we promise you’ll eat up these fun, DIY cookie faces. Dig in!

Inspired? Create and share by tagging @Hallmark_Canada.

17123 1
#

How to make DIY cookie faces

17123 2

What you’ll need:

#

Cut out your cookie faces

17123 3

We used three kinds of cookie dough created by cookie expert Bernard S.: chocolate cookie dough, sugar cookie dough and gingerbread dough. You can use your favourite versions—the ones passed down through your family or the ones that come refrigerated from your grocery store.

If you’re making your dough, once it’s mixed up, put it in the fridge to chill for at least an hour. Then print the free downloadable cookie templates and cut the faces out with scissors.

First, sprinkle a little flour on a sheet of parchment paper. This will help make sure your dough doesn’t stick. Roll all of your chilled cookie dough out onto the parchment—it should be a scant 1/4 inch thick. Then transfer the whole dough-covered sheet of parchment to a large baking sheet and pop it in the freezer for about 10 minutes.

Remove the dough from the freezer and place the templates on the dough. Trace them with the tip of your paring knife, then cut them out. Remove the extra dough and put the cookie faces back in the freezer to keep those edges nice and sharp when they bake.

Then just follow the baking instructions for each recipe and let your cookie faces cool completely. (This is really important!)

Pro tip: We’re all about the cookie decorating here, but great cookies start with great dough. Check out our best tips and tricks for rolling your dough.
#

Decorating your cookie faces

17123 5

Now for the fun part—decorating!

Your cookies must be completely cool before you start decorating. Otherwise, the icing will break down. If you have to bake and decorate on the same day, let the cookies cool to the touch on the rack, then give them a quick chill in the freezer (about 10 minutes).

Pro tip: Bake your cookie faces a week ahead and freeze them in a zipper bag ’til you’re ready to decorate.
17123 8

Make the royal icing

Start with the basic royal icing recipe mixed in a super-clean glass or metal bowl. (Fats can break down the icing, so you want your bowl completely free of oil or butter residue.) Mix the royal icing to the consistency of cake frosting and set it aside.

Next, separate the royal icing into as many smaller (and clean!) bowls as you want colours.

You’re going to thin it down by mixing in the tiniest bit of water. To test the consistency, run a knife or spatula through the icing.

When it takes a good 20 seconds to fill back in, it’s the right consistency. If it’s too thick, add a tiny bit more water and mix again. Too thin? Add a little more powdered sugar.

Pro tip: Adding too much water will make your icing runny. A spray bottle will allow you to control the amount of water so you can get the right consistency.

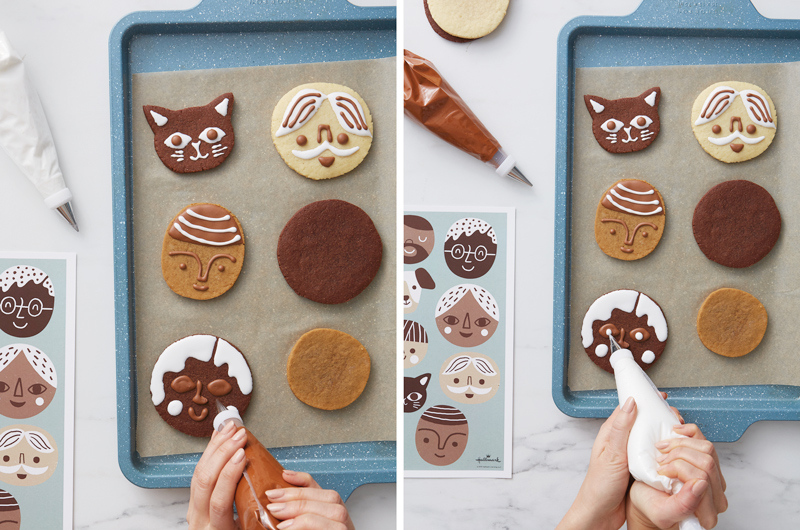
We used plain white royal icing and added tiny dabs of gel food colouring to create different shades of brown.

You’ll notice we kept our colour palette super simple because #aesthetic. If you want a wider range of options, check out this post about food colouring ratios for different skin tones.

We’ve provided our sketches to show different ways to try hair and noses and textures. But we don’t know your fam—you do. Play around!

17123 6

Fill your pastry bag with icing and pop on a no. 1 tip.

For the larger areas, like hair and beards, start by outlining with royal icing then fill it in. If there are any open spaces, you can use a toothpick to move the icing around before it starts to dry.

For a little dimension, let your first colour dry completely (about 2 hours) before adding another on top in a slightly thinned down icing. (If you add icing to wet icing, it’ll all smooth out in one layer.)

Pro tip: Have extra cookies to share? Host a cookie exchange or make someone a cute cookie bouquet!
17123 7

Once your royal icing has dried completely, you can make a fun cookie tree. Or package them up and give them as gifts (see our ideas on how to wrap ’em here)! Or eat them right away.

17123 4

You could also paint a super adorable house on butcher paper and serve your cookies on it.

Your beautiful cookie faces are officially ready to take on the world. 😉 We hope you enjoyed these sweet cookie decorating ideas. Happy baking!