Teacher appreciation ribbon craft
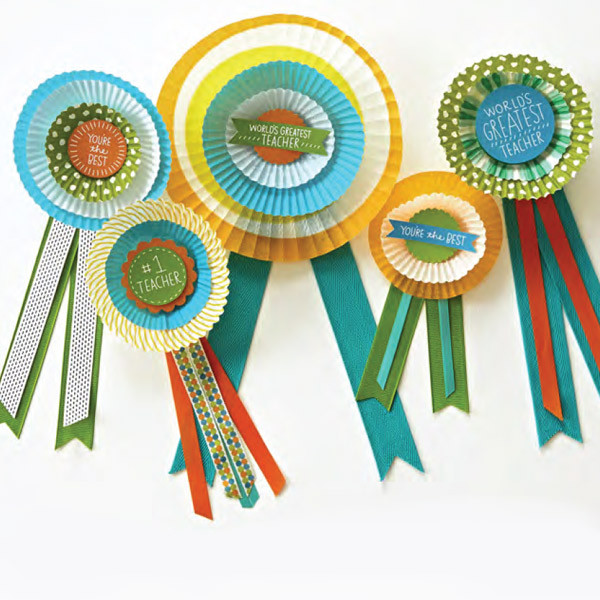
Know some special teachers who could use a little recognition? Try handing out an A+ or two with these easy-to-make teacher appreciation ribbons. Though this is definitely one award your teachers won’t see coming, the smiles it brings will be hard to miss! Made with cupcake liners, ribbon and our free printables, this easy craft is perfect for Teacher Appreciation Week.
Crafter level: Easy
Time needed: 15 minutes per award ribbon
Inspired? Create and share by tagging @Hallmark_Canada.
Ingredients
- Standard-sized cupcake liners
- Mini-sized cupcake liners
- 15-in. piece of wide ribbon (at least ½ in. wide) per award
- 13-in. piece of thinner ribbon (at least ¼ in. wide) per award
- Pin backs or magnets (optional)
- Low-temp hot glue gun and glue sticks
- Craft knife or scissors
Directions
- Create the top part of your award ribbon by layering your cupcake liners. This works best by pressing out the liners until they are almost flat and then flipping them inside out, so that the patterned side curls in, instead of out. Then using your low-temp hot glue gun, attach a small liner to a large liner, keeping both centred. Tip: You can trim standard-sized cupcake liners down to get a bigger variety in sizes.
- Now trim a piece of wider ribbon to 14 inches. Line the ends up and trim together to make both sides exactly the same. Now lay your ribbon down on a flat surface and create a "V." Use a dot of hot glue at the fold to keep them together in that shape. Then turn the V-shaped ribbon upside down.
- Take your thinner ribbon and trim a piece to 12 inches by lining the ends up. Now lay this ribbon down over the larger ribbon already glued in a "V" and line it up evenly. Attach with hot glue. Tip: By only gluing the top third of the second ribbon, you allow the tails to hang freely over the larger one, and it will look better when finished.
- To attach the cupcake liners to the ribbon, simply add a dot of hot glue to the top of your ribbons and centre them on the back of your cupcake liners.
- Print the templates provided and cut shapes to create the centre of your award ribbon. These can be cut from any colour paper you have or any photos or cards you want to reuse. Glue to the centre of your award ribbon for a personal touch.
- You can finish these however you’d like. If you want to make it wearable, glue a pin back in the centre of the back. If you’d like to make it a magnet, simply glue one on.