What you’ll need:
- Black tissue paper (plain or printed)
- Plastic wrap or clear cellophane wrap (for extra crinkle sounds)
- Black washi tape
- Hot glue gun
- Googly eyes (optional but awesome)
- Black pipe cleaners
- Scissors
- Popcorn
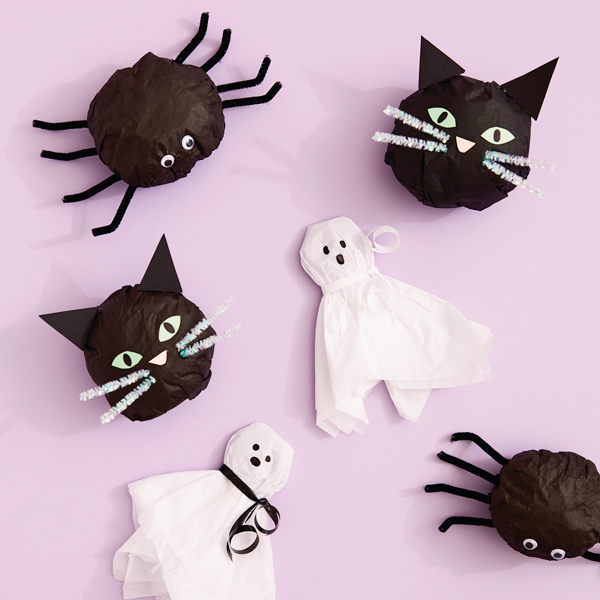
Ghosts, spiders and cats, oh my! Most of us wouldn’t want to come across any of these any day, let alone Halloween. But somehow these Halloween critters aren’t as scary when they come in the form of treat bags filled with popcorn, candy pumpkins and lollipops.
The perfect mix of cute and creepy, these Halloween tissue paper treat bags are made with only simple crafting supplies and a few sheets of tissue paper. Take them to the next classroom party, hand them out for trunk-or-treat or use them as party favours at your Halloween bash.
What you’ll need:
Step 1: Smooth out two sheets of tissue paper (one on top of the other) and use scissors to cut them into approximately 12″ squares. Each side will eventually be folded under, so the edges don’t have to be perfect.
Step 2: Tear off a sheet of plastic wrap or clear cellophane a little bit smaller than the tissue paper and place it over one of your double-layered squares. This is the lining—it’ll help you make a nice spider shape and keep the popcorn from poking through the tissue.
Step 3: Add about a cup of treats/popcorn onto the plastic wrap. Use a mug or measuring cup to scoop it out—that’ll keep your portions even and help you avoid touching the popcorn.
Being careful not to crush too many of the popcorn kernels, wrap the plastic around the goodies and shape it into a squatty ball for your spider. He doesn’t have to be perfectly round. Tape the plastic wrap closed.
Step 4: Fold the edges of the tissue paper into the middle. It may be easiest to tape down the folds as you go. Try to get the tissue paper to lay as flat as possible.
Step 5: Tape the tissue paper in place with black washi tape. This will be the bottom of the spider.
Step 6: Flip your spider over, and hot glue googly eyes to the front. These eyes could also be made of cut construction paper.
Step 7: Next cut your pipe cleaners in half, then bend the legs in little zig-zag shapes.
Step 8: Glue eight legs onto the bottom of the spider, four on each side.
That itsy bitsy spider has come alive! Now it just needs to crawl into the hands of all your neighbourhood kiddos and friends.
Tip: Looking for some popcorn that screams Halloween? Check out our Cookies and Scream Popcorn recipe.
What you’ll need:
Step 1: Smooth out two sheets of tissue paper (one on top of the other) and use scissors to cut them into approximately 12″ squares. Note: You may need to adjust the size of the square depending on the size of your lollipop.
Step 2: Center one lollipop in the middle of the tissue paper.
Step 3: Gather tissue paper around the lollipop, keeping the front side of the ghost face flatter so it’s easier to write on.
Step 4: Cut about 8” of curling ribbon and tie it around the base of the lollipop. We used both black and white ribbon and knotted it to the side.
Step 5: Use your scissors to curl the ribbon into a cute little neck bow.
Step 7: Now add a ghost face! Use a black Crayola marker to draw on two eyes and a mouth.
Wow, that ghost is scary cute! This is such a fun and easy way to make a sweet treat even sweeter.
What’s up, pumpkin?
Want to make a jack-o’-lantern-shaped tissue treat bag instead? Here’s how to create our Sweet and Easy DIY Pumpkin Surprise Treat Bags.
WHAT YOU’LL NEED
Step 1: Smooth out two sheets of tissue paper (one on top of the other) and use scissors to cut them into approximately 12″ squares. Each side will eventually be folded under, so the edges don’t have to be perfect.
Step 2: Tear off a sheet of plastic wrap or clear cellophane a little bit smaller than the tissue paper and place it over one of your double-layered squares. This is the lining—it’ll help you make a nice cat head shape and keep the candy from poking through the tissue.
Step 3: Add about a cup of treats onto the plastic wrap. Wrap the plastic around the goodies and shape it into a squatty ball for your cat. Tape the plastic wrap closed.
Step 4: Then bring the corners of the tissue paper square up to meet in the middle. Smooth the tissue down around the plastic-wrapped ball and tape it closed. This will be the back of the head.
Step 5: Cut out two pointed ovals for eyes and a little triangle for a nose. Draw the cat “eye slits” on top of the green pieces with your black marker to finish the cat eyes. Glue the face onto the front of your wrapped tissue paper ball.
Step 6: Next cut two triangles for the ears. To make them glue on easier, make a fold near the bottom edge to create a tab. This is where you can apply the glue.
Step 7: Now all that’s left are the whiskers! We love these cute iridescent pipe cleaners, but feel free to use any colour you have on hand. Cut into 4 pieces and use hot glue to attach.
Meow! Don’t let this black cat treat bag cross your path. Have fun delighting your friends, kid or neighbours with this creative Halloween treat.
What goodies should go inside?
There’s no shortage of options when it comes to treats to put in these tissue paper bags. Here are some ideas:
- Rounded candy or things without hard edges will make the cutest cat faces and keep your tissue paper from tearing.
- Fill treat bags of a different colour with nonfood goodies like rubber balls (or bouncy eyeballs), plastic bugs or spider rings, glow bracelets, mini-spring toys, bubbles, stickers or temporary tattoos, and other small surprises for kids with allergies or dietary differences.
- For special needs or neuro-divergent kids, talk to parents about little treats their kiddos will enjoy. This might include toys that light up or make noise, squishy balls or sensory dough, and fidget toys.


